-
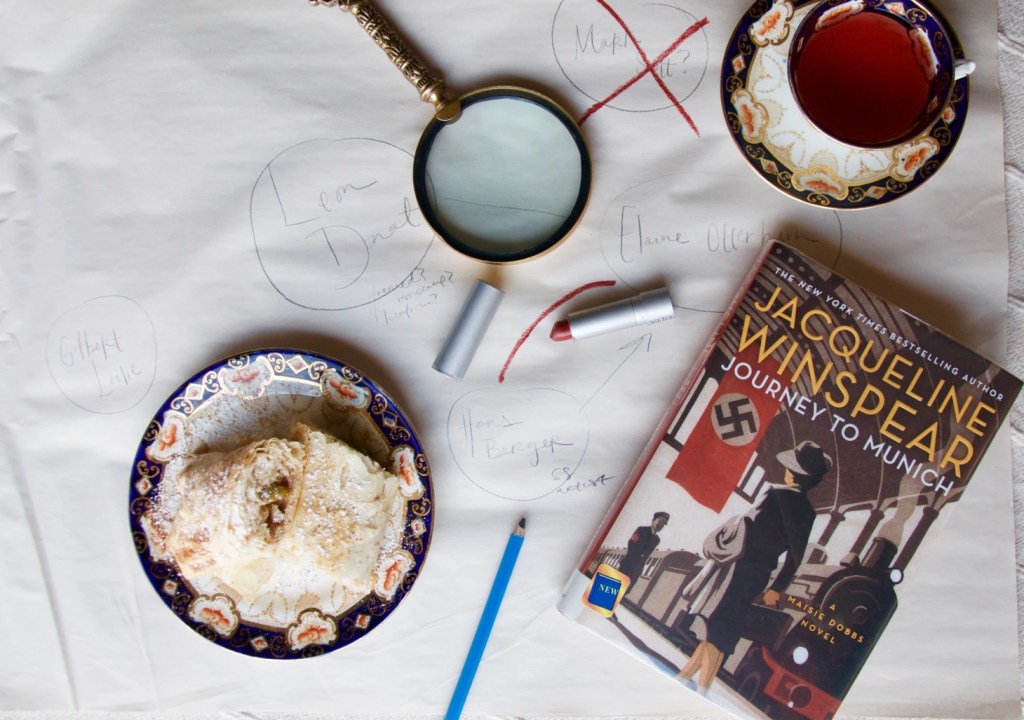
The desk clerk took Maisie’s Baedecker guide, opened the map inside, and lifted his pencil. “May I?”
“Of course,” said Maisie. “I need to know where I’m going.”
Flourishing the pencil, the clerk marked the place where Maisie could board a tram and the point at which she should step off. He told her where to walk, and made a note in the margin of his favorite coffeehouse, where he informed her that she could buy a slice of the very best apple strudel. Maisie thanked the man and set off.
For a Maisie-inspired apple strudel recipe, click here.
The Story:
If you’re unfamiliar with the series, Maisie Dobbs is about private investigator/ psychologist Maisie Dobbs and her many crime solving adventures in post-World War I London. As can be inferred from the cover, time has lapsed since the first novel which took place in 1929 and World War II looms on the horizon. Bringing back beloved old characters and introducing a few intriguing new ones, Maisie’s work becomes entangled with the international conflict.
I fear there’s not much else I can discuss without spoiling both this and the previous 11 novels. If you haven’t read Maisie Dobbs, though, you must! Winespear is a masterful writer who pulls you into Maisie’s world so that by the time you’re finished you feel as though you’re living in 1930s London where every place and person has been touched in some way by the War.
She also doesn’t fail to capture the increasingly tense climate growing in Europe as World War II approaches. I love Maisie’s insightfulness and compassion throughout the novels, as with the following:
“I saw two German girls playing. They must have been seven or eight. Both wrapped up warm and looking for the stray cat they’d befriended, to give it some food. Then they went on their way.”
“That sounds riveting, Fraulein D.”
“Give it a little while, and it might be: one was Jewish, and the other wasn’t. They were playing where they might not be seen, because one set of parents had forbidden their daughter to play with her friend–perhaps for the safety of both children, who knows? Given the climate here, on must be careful before pointing the finger of blame. But that’s the great sadness of any act of discrimination, isn’t it? When children cannot play together.”
Are you a Maisie fan? Do you have a favorite novel or character in the series? Are you, like me, wondering just how long you’ll be forced to waste away before being gifted with the thirteenth novel?!
-
“What are you doing?” Emma asked.
“Ordering pizza from Nightshade’s,” said Malcom. “There’s an app.”
“A what?” said Dru.
“Nightshade?” Livvy turned around. “The vampire?”
“He owns a pizza place. The sauce is divine,” Malcolm said, kissing his own fingers.
“Aren’t you worried what’s in it?” said Livvy.
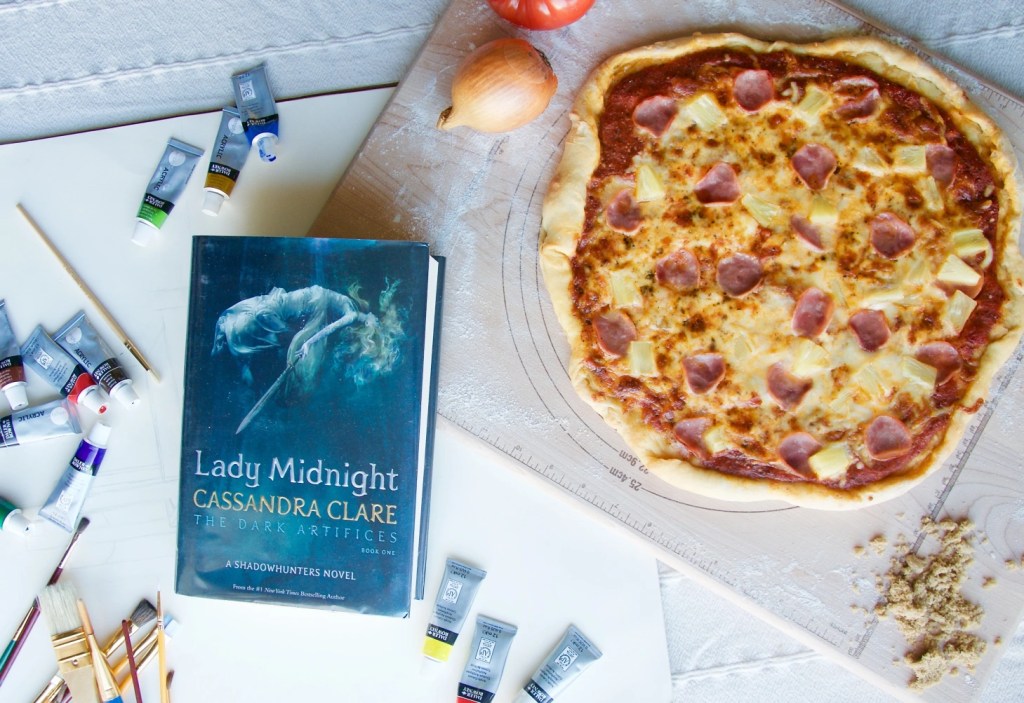
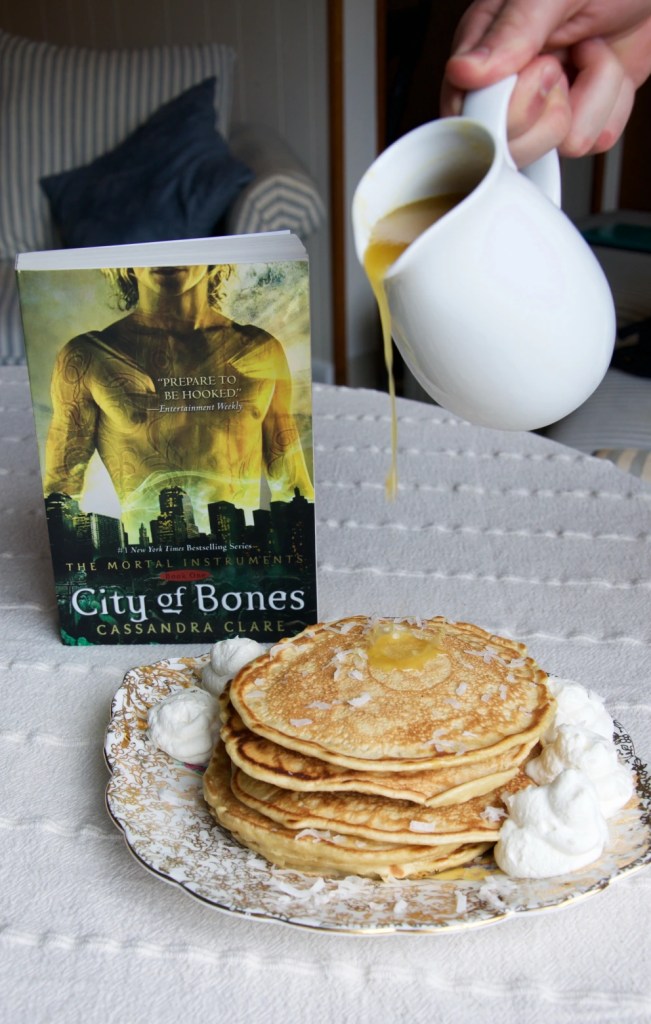
Click here for my review of Cassandra Clare’s latest installment in the Shadowhunter saga, Lady Midnight.
Did anyone else notice how many times the Blackthorns ordered Nightshade pizza? Was anyone else craving pizza with an out-of-this-world sauce? You will suspect addictive demon powders have been slipped into this sauce.
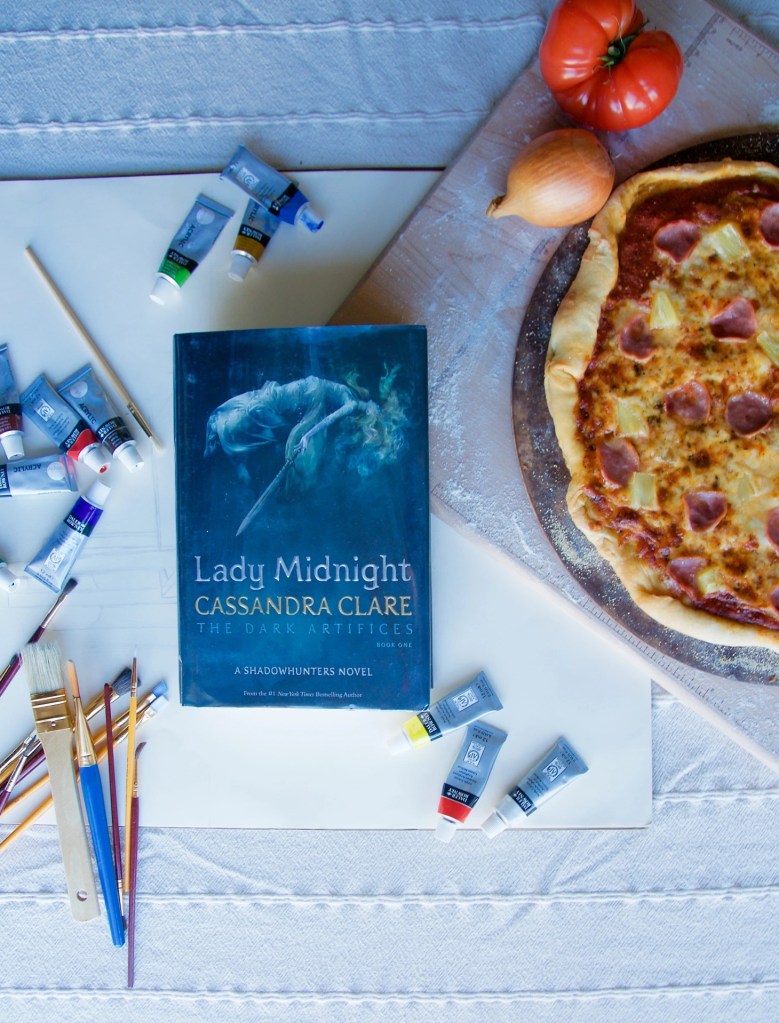
The secret ingredient: brown sugar. It creates a lovely syrup that bites through the acidic tomatoes and brings a delicious balance of sweet and savory, with a spicy kick.
You can refrigerate any remaining sauce in an airtight container for up to one week. I haven’t had a chance to test this theory yet, but I suspect this sauce would also make an excellent tomato-basil soup with a splash or two of milk/cream.

My toppings were inspired by the beachy locale — a crispy, thin crust pizza topped with stringy mozzarella, Canadian bacon, and pineapple.
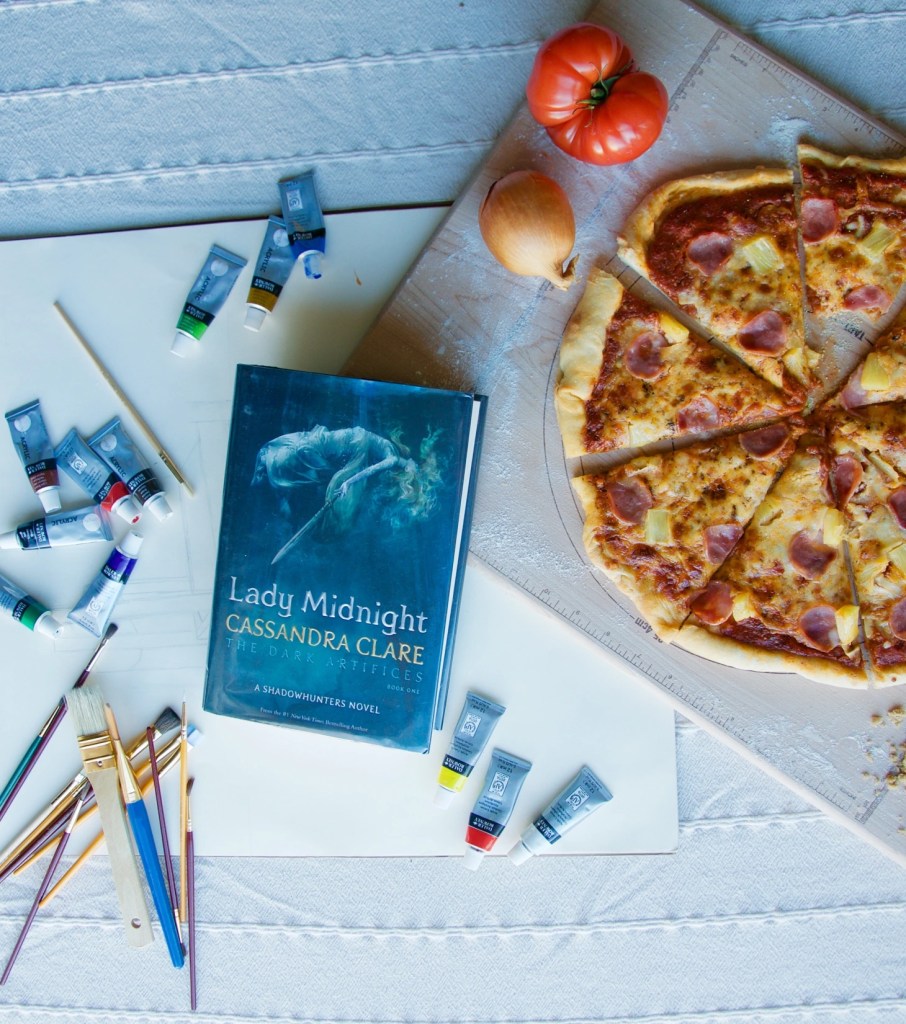
I used my simple, go-to bread recipe for the crust. I only needed about a quarter of the dough to spread a thin crust. I also recommend using a pizza stone that has preheated in the oven at 450° F for at least 30 minutes. Bake the pizza for 20-25 minutes.
Nightshade’s Pizza Sauce
Ingredients:
1 tablespoon olive oil
1 diced onion
2 cloves of garlic
2 tablespoons brown sugar
1/8-1/4 teaspoon of cayenne pepper (It depends how much of a kick you want. Be warned, cayenne is quite strong.)
1 teaspoon salt
2-28 ounce cans of diced tomatoes
3 tablespoons dried basil (or 1/2 cup of fresh basil, if available)
Directions:
- Heat 1 tablespoon of olive oil in a large heavy bottomed pan on medium heat. (I use my Le Creuset).
- Add the onion and caramelize for 10 to 15 minutes. The longer you cook the onion, the better. Caramelized onion will create a sweeter flavor. The onions will first start to look translucent and then begin to darken. If the onion sticks to the pan, add a splash of water.
- Add the garlic and cook for another 2-3 minutes.
- Turn the heat off, but leave the pan on the heat. Add the brown sugar and stir quickly. Sugar burns easily! The brown sugar will become a syrup. If necessary, you can turn heat on low. Once you have a syrup, add the cayenne, salt, and diced tomatoes.
- Simmer on medium heat for 45 minutes, stirring occasionally. Simmering will bring all of the flavors together. In the final 5 minutes, add the dried or fresh basil.
- Remove the pan from the heat blend the sauce with an immersion blender. Be sure the blender always stays immersed in the sauce. You don’t want scorching tomato sauce flying all over your kitchen! (Option to use a regular blender).
- Once completed, build your pizza! After spreading out my dough, I brushed the dough with olive oil then spooned on the sauce. Add your selected toppings and bake at 450° F for 20 to 25 minutes.
Chef’s kiss, just like Malcom.
-

“All right, enough,” said Jules. “We’re taking a break from killings and profiles for dinner.” He took the boxes from Emma, shooting her a grateful look, and set them down on the coffee table. “I don’t care what you all want to talk about, it just can’t involve murder or blood. Any blood.”
“But it’s vampire pizza,” Livvy pointed out.
“Immaterial,” Julian said. “Couch. Now.”
For a pizza + sauce recipe that will have you raving over how it could possibly be so good, click here.
4/5 stars
The Story:
Lady Midnight picks up five years after the Dark War, during which Julian Blackthorn and Emma Carstairs’s lives were turned upside down. Without spoiling The Mortal Instruments for those who haven’t read or finished the series yet, Emma and Julian are two seventeen year-old Shadowhunters with an inordinate amount of responsibility as they work to keep Los Angeles safe from demons, as well as to raise the four younger Blackthorn siblings.
While the story stands apart from The Mortal Instruments, I wouldn’t recommend reading this series without reading TMI. There’s a lot of references to Clary and the gang that would be confusing and spoil the previous series.
My Loves:
- The setting. Cassandra Clare captured a New York City lifestyle in TMI and I loved seeing how she adapted the Shadowhunter lifestyle to California with simple elements like cars. Can you imagine Jace driving a car? It just doesn’t jive. Clare’s descriptions pulled me into the world and by the end, I was salivating for a California vaca.
- Julian. So often the YA lit love interest is the bad boy. Case in point — Jace. Julian, however, is a responsible adult. He’s gentle, generous, and loving as he sacrifices personal comforts to raise his younger siblings. He was an intriguing character and a welcome relief from the stereotype.
-

Clary spoke up hastily. “What’s all the raw meat for?” she asked, indicating the third page of her menu.
“Werewolves,” said Jace. “Though I don’t mind a bloody steak myself every once in a while.” He reached across the table and flipped Clary’s menu over. “Human food is on the back.”
…Clary, after a moment’s hesitation, chose a large coffee and coconut pancakes. The waitress winked a blue eye at her and flounced off.

I recreated a scrumptious and cozy breakfast that Simon and Clary would have enjoyed together before their lives got turned upside down by Jace and the Lightwoods, when they didn’t have to worry about finding the “human side” of the menu at Taki’s. Simon would bring his nerd gear while Clary sketched away.
Of course, coconut pancakes needed something tropical and delicious with a slight kick, thanks to the ginger. Thus enters a divine Pineapple-Ginger Syrup. Pancakes are hardly a daily occurrence in our house and I wasn’t sure how to store all that extra syrup. It was too delicious to throw out! So I made it into a marinade by throwing in a few minced garlic cloves and 1/2 cup of soy sauce. There’s more sugar in the syrup than I’d usually allow in my marinades, but I’m betting there’s no more sugar in it than any sauce you’d buy at the store! It made a delicious chicken stir fry spooned on top of brown rice.

Enjoy these very human coconut pancakes. Perhaps my next post will be a toasted bat sandwich…
Pineapple-Ginger Syrup
Ingredients:
1 pineapple
Fresh ginger root
1/2 cup sugar
1/2 cup honey
2 cups water
2 teaspoons lemon juice
Directions:
- Cut the rind from the pineapple. Chop the pineapple, including the core.
- Peel the skin off the ginger root.
- Combine the chopped pineapple, sugar, and honey in a small saucepan with 2 cups of water. Peel 8-15 slices of ginger into the saucepan, depending on how much of a ginger “kick” you want.
- Simmer for 20 minutes until the pineapple softens.
- Remove the pan from heat and blend with an immersion blender, until smooth. Make sure the immersion blender is fully immersed so that hot liquid doesn’t splash up!
- Return the mixture to heat and simmer for another 15 minutes.
- Strain the mixture into a bowl and add the lemon juice.
Coconut Pancake Recipe
Ingredients:
1 and 1/2 cups all-purpose flour
1 tablespoon brown sugar
1 teaspoon baking powder
1/2 teaspoon baking soda
3/4 teaspoon salt
2 large eggs
14 ounce can light coconut milk
1 teaspoon vanilla
Directions:
- Whisk together all dry ingredients in a medium bowl.
- In a small bowl, measure out 1 and 1/2 cups plus 3 tablespoons of light coconut milk. (Reserve the remaining coconut milk). Whisk eggs and vanilla with the coconut milk.
- Add the wet mixture to the dry and gently mix to combine. Do not overmix. Allow the pancake batter to sit at room temperature for 15 to 30 minutes before cooking.
- Heat a nonstick pan over medium heat. While the pan heats, place a cookie sheet in the oven and turn the oven on to 200 degrees F. After the oven preheats, turn the oven off.
- Once the pan has heated, grease with non-stick spray and pour 1/3 cup of batter into the pan. Cook until bubbles appear on the surface and the bottom is golden brown. Flip over and cook for about 2 minutes. Keep warm in the oven on the cookie sheet while cooking the remaining pancakes.
- Serve a hot stack of pancakes with pineapple-ginger syrup (recipe above), desiccated coconut, and a drizzle of the leftover coconut milk.
-
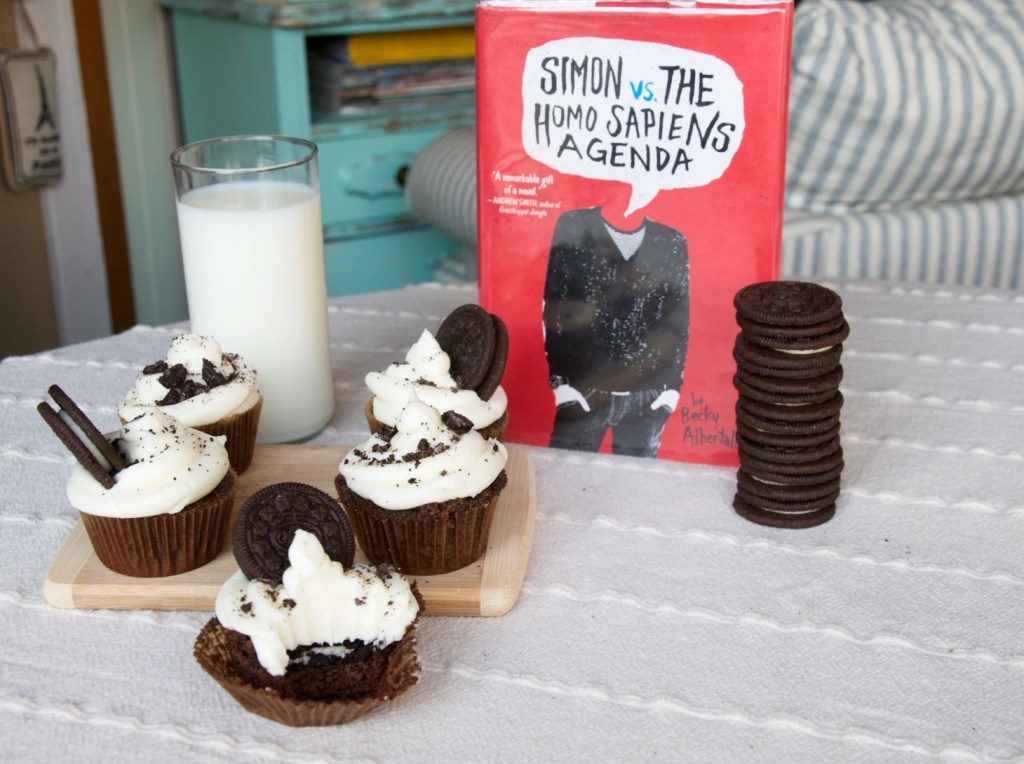
All right – I have a sneaking suspicion that you’re not 100% committed to your Oreo diet. The guidelines are really pretty basic. No excuses. Breakfast is obviously an Oreo granola bar or Oreo Pop-Tart. No, they’re not gross. Shut up. They’re amazing. Lunch should be Oreo pizza with an Oreo milk shake and a couple of those Oreo truffles my mom makes (a.k.a. the most delicious freaking things in the universe). Dinner is deep-fried Oreos served on top of Oreo ice cream, and for a drink, it’s Oreos dissolved in milk. No water. Only Oreo milk. Dessert can be Oreos straight up. Sound reasonable? It’s for your health, Blue.
For my review of Simon vs. the Homo Sapiens Agenda, click here!

You can’t NOT want Oreos after reading Simon vs. the Homo Sapiens Agenda. Simon is obsessed with them. They’re a major food group for him. Case in point, a direct quote from Simon: “Okay, first of all, Oreos absolutely qualify as a food group.”
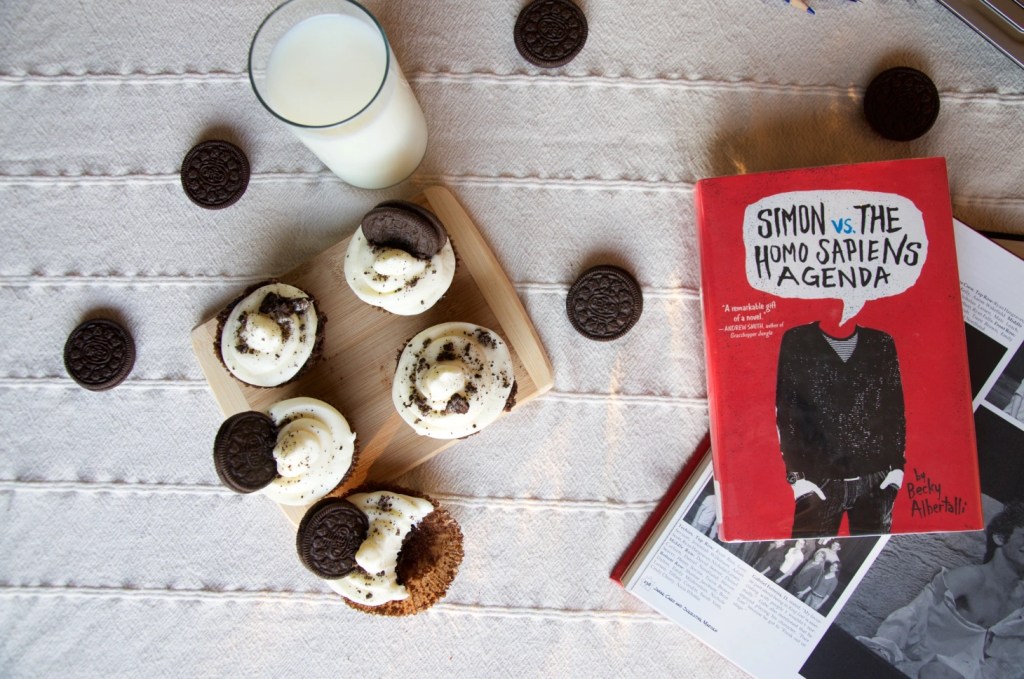
I’m gonna give you some freedom with this recipe. It’s all about texture. I scooped the batter into the cupcake tins and then added my Oreo on top. The result? Deliciously moist cake with a crisp Oreo on top. I loved the slight difference in textures. You can also put the Oreo in the bottom and then add the batter. The cookie gets soft as the cake and cookie sort of mesh together into this Oreo goodness. You really can’t go wrong on this one. You could even do both.
There’s also freedom with the cake recipe. Use your favorite chocolate cake recipe! I’ve got a link to mine below from Zoe Bakes, though I’ve also written it out for you. It’s the same recipe I used for my Chocolate Cake with Chocolate Ganache and Carmelized Hazelnuts.
What do you think? Simon approved?
Oreo Cupcakes Recipe
Ingredients:
Makes 18 cupcakes
Chocolate cake recipe from Zoe Bakes
1 package of Oreos
4 ounces unsalted butter, softened at room temperature
1 cup of sugar
2 extra-large eggs, at room temperature
1/2 cup milk, at room temperature
1 teaspoon pure vanilla extract
1 cup all-purpose flour
1/3 cups cocoa powder
1 and 1/2 teaspoons baking powder
1/4 teaspoon baking soda
1/4 teaspoon salt
Directions:
- Preheat the oven to 350° F. Prepare cupcake tin with cupcake liners.
- Cream the butter for 2 minutes in a stand mixer fitted with the paddle attachment. Add the sugar and continue creaming until light and fluffy, scraping down the bowl as needed with a rubber spatula, about 2 more minutes. Lower the speed and add each egg, one at a time, blending until incorporated. Scrape bowl as needed.
- Mix together the milk and vanilla in a measuring cup. Set aside.
- In a medium bowl, whisk the dry ingredients together. Starting with and ending with the dry ingredients, alternate adding the dry ingredients and the milk mixture, in portions at a time. Scrape bowl as needed.
- Scoop about 2 tablespoon of batter into each cupcake liner and press the Oreo on top.
- Bake for 15 minutes, until an inserted toothpick comes out clean.
- Allow cupcakes to cool completely before frosting.
Frosting Recipe
Ingredients:
8 ounces cream cheese, at room temperature
4 ounces butter, at room temperature
4 cups of powdered sugar
Directions:
- In a stand mixer, beat the butter and cream cheese together on high for two minutes, scraping down the sides of bowl as need.
- Reduce the mixer speed to low and add the powdered sugar in portions at a time. Scrape down the sides of the bowl as needed.
- After adding all of the powdered sugar, turn the mixer on medium high for a minute to fully incorporate the ingredients.
- Using a rubber scraper, spoon the icing in a piping bag (or create your own piping bag by spooning the icing into a ziploc bag and cutting off a corner. For the swirls, you’ll want to make a fairly wide opening, about the size of a dime.
- Beginning from the center of the cupcake, spiral outward and then back toward the center.
- Decorate with crushed or whole Oreos, as desired.
-

Blue,
Okay, first of all, Oreos absolutely qualify as a food group. Second of all, they’re the ONLY food group that matters. My sisters and I actually made up this place called the Shoreo a few years ago one night when we were staying at our aunt’s house. It’s like this place where everything is made of some kind of Oreo, and the river is an Oreo milk shake, and you sit on top of this massive Oreo and float down it. You get to scoop up cups of milk shake whenever you want. It’s kind of like that scene in Willy Wonka, I guess.
For my Oreo-obsessed Simon inspired cupcake recipe, click here.
5/5 stars
The Story:
Simon Spier is a typical 16 year-old high school student, with a secret he hasn’t told anyone yet — well, no one except Blue, his anonymous pen pal. Becky Albertalli weaves Simon’s journey as a gay teenager through the secrets, the bullying, and the self-discovery.
My Take:
There were so many wonderful things about this novel. Simon is charming, hilarious, whiny, dramatic — a typical teenager and yet so endearing. High School was never my jam. I enjoyed college much more and couldn’t wait to leave High School. And yet, this novel made me nostalgic for being a teenager again. Amidst the angst and major stress as he tries to decide whether or not he wants to come out to his friends and family, he is so carefree in his friendships and with his family. I especially loved his family. Wonderfully nerdy and perfectly supportive and loving. Overall, Simon just tugged at my heart and how could he not with words such as these:
“But I’m tired of coming out. All I ever do is come out. I try not to change, but I keep changing, in all these tiny ways. I get a girlfriend. I have a beer. And every freaking time, I have to reintroduce myself to the universe all over again.”
-

She kicked Chaol in the ribs with a sock-covered foot. “All I’m saying is that I’d like some chocolate cake every now and then.”
He closed his eyes. “And an apple tart, and a loaf of bread, and a pot of stew, and a mountain of cookies, and a—“He chuckled as she put her foot against his face and pushed. He grabbed her foot and wouldn’t let go when she tried yanking her leg back. “It’s true, and you know it, Laena.”
“So what if it is? Haven’t I earned the right to eat as much as I want, whenever I want?” She wrenched her foot out of his grasp as the smile faded from his face.
“Yes,” he said quietly, his voice barely audible over the crackling fire. “You have.” After a few moments of silence, he stood up and walked to the door.
She sat up on her elbows. “Where are you going?”
He opened the door. “To get you chocolate cake.”
For a Crown of Midnight review, click here.
Chocolate cake makes several appearances in Crown of Midnight, my favorite being the one that Chaol and Celaena devour half of in one evening. My goal was to whip up a cake that would have had the two of them liking the crumbs off the plate.

The best part of this cake is that it’s little work with lots of wow factor. First, you’ll want to make your hazelnut brittle, recipe below.
After that, any chocolate cake recipe will do, though I would recommend this one from the blog Zoe Bakes. Zoe is a pastry chef and every recipe I’ve tried from her blog has been phenomenal. I had to double the recipe so I’ve written out the doubled recipe below. Make sure you take your 2 cups of milk, 2 sticks of butter, and 4 eggs out of the fridge at least 1 hour before you start baking. These ingredients need to be at room temperature.

After the cake has completely cooled, you’ll whip up your ganache. My ganache recipe is also below. You’ll want to give the ganache at least ten minutes to cool or it will be too thin when you pour it over your cake. Just let it sit and give it the occasional stir with your rubber spatula. Then drizzle it over the top of your cake. The leftovers (if you manage to have any) can be stored in the fridge for up to a week or in the freezer for up to a month. Just put it back on the stove for a few minutes to melt it back down.
Finally, crush up your cooled and hardened brittle. Wrap up the candy in parchment paper and crush it with a rolling pin until you have pieces your desired size. Sprinkle on top of the cake and keep the rest for late night munching. Celaena would definitely approve.
Hazelnut Brittle Recipe
Ingredients:
1/2 cup sugar
1/2 cup corn syrup
3/4 cup (1/2 pound) hazelnuts
Directions:
- Prepare a cookie sheet covered with a piece of parchment. Place this near the stove.
- Combine the sugar and corn syrup in a heavy bottomed pot. Place on medium heat and stir until the sugar dissolves and the mixure is bubbling.
- Continue to cook the mixture for 8 to 10 minutes until the mixture turns light amber (dark amber =burned). Keep a close eye on it and stir occasionally. It will thicken and get more difficult to stir, but you don’t want the sugar at the bottom of the pan burning.
- Turn down the heat and stir in the nuts. Turn the heat back up to medium and continue to stir for one minute.
- Pour the mixture onto parchment paper and allow to cool.
Chocolate Cake Recipe
Ingredients:
8 ounces unsalted butter, softened at room temperature
2 cups sugar
4 extra-large eggs, at room temperature
1 cup milk, at room temperature
2 teaspoons pure vanilla extract
2 cups all-purpose flour
2/3 cups cocoa powder
2 and 1/2 teaspoons baking powder
1/2 teaspoon baking soda
1/2 teaspoon salt
Directions:
- Preheat the oven to 350° F. Grease a 10 1/2 inch bundt pan.
- Cream the butter for 2 minutes in a stand mixer fitted with the paddle attachment. Add the sugar and continue creaming until light and fluffy, scraping down the bowl as needed, about 2 more minutes. Lower the speed and add each egg, one at a time, blending until incorporated. Scrape bowl as needed.
- Mix together the milk and vanilla in a measuring cup. Set aside.
- In a medium bowl, whisk the dry ingredients together. Starting with and ending with the dry ingredients, alternate adding the dry ingredients and the milk mixture, in portions at a time. Scrape bowl as needed.
- Pour the batter into the bundt pan and bake for 40-45 minutes, until a toothpick is inserted and comes out clean.
Chocolate Ganache Recipe
Ingredients:
1 cup semi-sweet chocolate chips
1/2 cup heavy cream
1 teaspoon vanilla
Directions:
- Combine all ingredients in a small saucepan.
- Cook over low heat, stirring occasionally with a rubber spatula until the ingredients have melted together into a smooth mixture.
- Remove from heat and allow to cool about ten minutes before pouring over cooled cake.
-

“Is that…chocolate cake?”
“I thought you might need some.”
“Need, not want?”
A ghost of a smile was on her lips, and he almost sagged in relief as he said, “For you, I’d say that chocolate cake is most definitely a need.”
Click here for a Crown of Midnight inspired chocolate cake recipe.
Click here for a review of the first book in the series, Throne of Glass.
The Story:
At the cost of nearly her life, Celaena has won the title of champion. Now she’s her enemy’s assassin, dispatched to remove the King of Adarlan’s dissenters. She’s living luxuriously off her blood money in the glass castle, but her friend Nehemia won’t allow her to enjoy these comforts, and neither will Celaena’s conscience. It’s time for Celaena to decide whose side she’s truly on and her reluctance to choose will come at a price.
My take (with spoilers!):
As we continue to get bit by bit of Celaena’s story and background, Crown of Midnight is a trial for her and by the end she’s truly broken. Celaena struggles from understandable trust issues as the friends she’s allowed into her heart are stripped away, first Nehemia, then Chaol, and finally Dorian – if anything just because of distance.
Did you feel her anger toward Chaol was justified? I’m disappointed that Chaol didn’t tell Celaena about the King’s plans, but was also disappointed that Celaena was so quick to believe Archer without speaking with Chaol and giving him a chance to explain his actions.
I’m dying to know where Celaena will go from here. How will she recover from the tragedies she’s endured? Will she take up her crown as Queen of Terassen? What will happen with Chaol? Poor Chaol.
-

“She [Nina] shoved one of the cakes from the coffee service into her mouth …”
Nina was always eating sweets and was especially enamored with cake. I set out to make one that would have her salivating. For a Six of Crows book review, click here.
This recipe has several components, so I recommend reading it all the way through before beginning. You can also make it in steps. The crème anglaise can be made the night (or a couple nights) before. As can the sponge cake. Everything must be cool to assemble.

Traditionally, a Swedish Princess Cake is green, but I gave mine a rosy tint that I thought Nina would better appreciate. Also, these cakes are typically much larger. It’s a very sweet cake, though, and the miniature version is the perfect portion size.

This cake is a sponge cake, baked in a muffin tin, cut in half and spread with some fresh crème anglaise and raspberry jam. I suppose you could substitute the crème anglaise with pudding, though it feels like heresy just suggesting it. The crème is the most difficult part of this recipe. Because you need patience, young Padawan. Lots and lots of patience. Don’t look away from your crème for even a moment. Don’t blink. Blink and
youyour crème anglaise is dead. Just keep an eye on it and I promise you and the crème will make it out deliciously alive.
This recipe will make about 2 dozen princess cakes. I recommend making the number you need because the leftover scraps make for a divine trifle. Just layer the cake, fresh crème anglaise, fresh whipped cream, and jam in a glass dish and voila.

Princess Cake
Ingredients:
Sponge Cake cupcakes (I used this recipe. Some notes below.)
Crème Anglaise (recipe below)
Fresh whipped cream (directions below)
Seedless raspberry jam
8 ounce package of marzipan
Your choice of food coloring (or food coloring gel)
Directions:
- Make the crème anglaise and allow to cool in the refrigerator. Recipe below.
- Make your sponge cake cupcakes. Allow to cool. Recipe below.
- Make the whipped cream. Directions below.
- Slice the cupcakes in half.
- Spread the bottom half of the cupcake with crème anglaise. Spoon 1 teaspoon of raspberry jam on top of the crème. Do not spread the jam to the edges. Keep it in the center.
- Place the other half of the cupcake on top, like a sandwich.
- Spread the sides and top with whipped cream. You will need extra cream on top to shape a dome. I found my (clean) hands to be the most helpful tool for shaping the cream, especially with how small the cakes are.
- Line the completed domes on a cookie sheet and cool in the refrigerator while you prepare the marzipan.
- Unwrap the marzipan. If you have a stand mixer, I recommend kneading the marzipan with a dough hook. It’s easier and you won’t stain your hands with food dye. If you don’t have a stand mixer, it does help to wear gloves to avoid staining your hands. Kneed your preferred color into the dough. I wanted to get a deep corporalki red, but I started to get nervous after 40 drops of red food coloring. I didn’t want to add too much liquid to my marzipan. You won’t have to worry about the liquid if you use gel food coloring.
- Dust a clean surface with powdered sugar (just like you would do with dough and a flour dusting). Roll out the marzipan into a thin layer. Find a round cookie cutter, glass, tubberware, or bowl bottom that’s about 6 inches in diameter. (If you get the size wrong, just put the circle back in the sheet of marzipan and pat it back into place).
- Pull the pan of cakes from the fridge and drape the marzipan over the cake, careful not to smash your dome. Pat the marzipan into shape and use a knife to press the edge of the marzipan into the cake and then cut off the excess along the bottom. Finish shaping the marzipan, using your fingers along the bottom to give the marzipan a nice crimped edge.
- The cakes can be served immediately. Store in the fridge in an airtight container for up to 3 days.
Crème Anglaise
From The Joy of Cooking
Ingredients:
5 large egg yoks
1/2 cup sugar
2 cups whole milk (I used 1 cup skim milk and 1 cup heavy cream)
1 vanilla bean (optional)
1/2 teaspoon vanilla (optional)
Directions:
- Note: do not allow your mixture to come to a boil at any time. Remember….don’t blink!
- Pour the 2 cups of milk into a saucepan (preferably a heavy bottomed one). If you want a vanilla flavored custard…
- Cut the vanilla bean lengthwise in half. Scrape the seeds into the milk.
- Bring the milk to a very gentle simmer. You’ll see steam and some bubbles around the edges of the pan. That’s perfect. You don’t want anything that resembles a boil. Remove the pan from the heat and allow the vanilla bean to steep for 15 minutes.
- Strain the vanilla bean and then proceed with the recipe.
- (If you don’t have vanilla bean, you can pick up the recipe from here). In a medium bowl, lightly beat the egg yolks and sugar. Set aside.
- Heat the 2 cups of milk on low heat. One the mixture is steaming and there are small bubbles around the edges, you’re good. Remember, no boiling.
- Remove the milk from the heat. With one hand, whisk the egg and sugar mixture. You must keep it moving. With your other hand (or get a willing friend) slowly pour a ladle of the hot milk into the egg mixture. By keeping the egg mixture moving, you’ll prevent the egg from scrambling. Whisk in the rest of the milk.
- Return the mixture to the saucepan and return to low heat. Watch carefully and continue to slowly stir the mixture with a rubber spatula, especially sweeping the bottom of the pan. Do not let it boil. By keeping the heat low and stirring, you can warm the mixture slowly enough.
- Once it’s thick enough to coat the back of a spoon (or has reached 175° on a candy thermometer), remove from heat. Pour the custard into a bowl and allow it to cool at room temperature. Place in the fridge, uncovered, and allow to chill for at least 1-2 hours before layering on your Princess Cake
- NOTE: If your crème anglaise began to boil or appears slightly curdled (read: lumpy), do not panic! Pour the mixture into a bowl, allow to cool at room temperature, and then refrigerate uncovered. When you pull it out of the fridge, just give it a nice stir and it will smooth out. No one will be the wiser! This does not apply if the eggs have scrambled. I’m afraid there’s not much that can be done about that.
- Once the custard is cool, you can cover it with plastic wrap. Press the plastic wrap against the custard. This will prevent condensation from forming. Store covered in the fridge for up to 3 days.
Sponge Cake
Choose your favorite sponge cake recipe. I used this one and found the accompanying video extremely helpful.
- Spoon 2 tablespoons of batter into a regular sized muffin tin with paper cupcake liners. I made 8 cupcakes and then poured the rest of the batter into a ungreased 8X8 pan. The pan must be ungreased to allow the cake to properly rise. It needs to cling to the sides of the pan.
- The cupcakes will bake about 15 minutes. Follow the directions on your recipe for testing doneness.
- When you pull the cupcakes out of the oven, you’ll want to find a way to let them cool upside down, otherwise the cake will collapse on itself. (If you have no way of getting them upside down, don’t worry too much about it). My cupcakes didn’t quite reach the top of the liners, so I was able to turn them upside down on a clean counter, balanced on the top edge of the liner. If you used a nonstick pan, the cakes will stick to the pan. This is good. Balance the edges of a pan on two glasses.
- The cake is sticky. Once the cakes are cool, carefully unpeel the liner. You’re now ready to begin your princess cakes.
Whipped Cream
Ingredients:
Cold heavy cream
Sugar
Directions:
- For every 1 cup of heavy cream, add 2 tablespoons of sugar. I whipped 2 cups of cream, part of which was used in my trifle.
- Pour the cream and sugar into a large bowl. Whisk on high with a stand mixer or hand mixer until the cream has stiff peaks. Watch it carefully, though. If you beat it too long, you’ll end up with butter!
-
5/5 stars
For a Nina-inspired cake recipe, click here.
The Story:
Cruel mob boss Kaz Brekker has a new job: break into the most impenetrable prison ever built. Enlisting the help of five other criminals from the Ketterdam slums, the six are staging a heist that will make them rich beyond their wildest dreams. The journey strains Kaz, though, breaking through his armor to reveal a seventeen-year-old vulnerable boy with a haunting past.
Set in the Grisha Universe, Six of Crows takes place after the Grisha trilogy, though you wouldn’t need to read the trilogy to follow Six of Crows. I cringed when I realized the novel switched POV each chapter and alternated between several characters. I’ve seen it done poorly too many times. Bardugo, though, is a master! Despite having six main characters, each is dynamic and fully fleshed out.
Have you seen the cover reveal for the sequel, Crooked Kingdom?? September can’t come fast enough! How are her covers always so beautiful?
Spoilers begin here. You have been warned.
Favorite trait from each member of the crew:
Nina: Nina’s an interesting character. She brings a sense of delicacy to the group, probably because of her upbringing in the Little Palace. She’s not delicate, though. She’s on occasion crude, certainly witty, and has a penchant for sweets which I can get behind.
Mathias: He’s so stalwart in his loyalty to his country, but once he recognizes that what they’re doing is wrong, it’s not as though he loses that sense of honor, it just gets redirected.
Wylan: Interestingly, Wylan’s is the only POV not represented in the novel and I’m intrigued what sort of twist that’s going to lead to in the next installment. We still get a good look at him through others’ eyes and he adds an innocence to the group that the others lack. He’s had enough struggles, though, that it’s not naiveté.
Jasper: Jasper had a major turning point near the end of the novel and I’m curious to see what he will do in Crooked Kingdom. He’s the adrenaline junky and runner, but he’s learning to stand and fight for better reasons than the rush.
Kaz: Frightening.
The boy they called Dirtyhands didn’t need a reason any more than he needed permission—to break a leg, sever an alliance, or change a man’s fortunes with the turn of a card.
So prickly that it’s heartbreaking, even in dire situations. After seeing Inej nearly killed, he still doesn’t crack.
Inej: “You came back for me”
“I protect my investments.”
In the brief window that his defenses crumble, his vulnerability puts Inej in danger and she’s captured. What will this do to Kaz’s character by the next book?
Inej: I love her physical and internal strength. Inej has to do some awful things to survive the slums. She adapts and does what she needs to, but she doesn’t become jaded. She regrets anytime she has to kill someone, regrets how her actions would affect her family. The most revealing scene for her is when she’s climbing the incinerator shaft and in that moment of despair and defeat she pulls herself up physically, but also symbolically as she realizes she can serve a much bigger purpose.
-
Subscribe
Subscribed
Already have a WordPress.com account? Log in now.
